.NET MAUI Embedding - Grial UI Kit
The controls from Grial UI Kit can be used in an Uno Platform application via .NET MAUI Embedding.
Sample App
An existing sample app that showcases the controls is available here.
Installation
In order to use the Grial UI Kit controls, you first need to sign up.
After signing up, when you log in to the admin portal, you'll be prompted to create a Grial app by entering the name of the application. Once you've created the Grial app, go to the Download tab and select Download Kickoff Solution - at this point, you'll be prompted to purchase a license, which you'll need in order to proceed with using Grial.
Extract the downloaded zip file and locate the GrialLicense file. We'll add this file to the Uno application. Also in the zip file, open the csproj file and retrieve the ApplicationTitle and ApplicationId property values.
<!-- Display name -->
<ApplicationTitle>[ApplicationTitle]</ApplicationTitle>
<!-- App Identifier -->
<ApplicationId>[ApplicationId]</ApplicationId>
The last thing we'll need from the zip file is the nuget.config file. This file will also be added to the Uno application.
Getting Started
Create a new application using the
unoapptemplate, enabling .NET MAUI Embedding. In this case, we're going to use the Blank template (-preset blank) and include .NET MAUI Embedding support (-maui).dotnet new unoapp -preset blank -maui -o MauiEmbeddingAppRemove the
net8.0,net8.0-maccatalyst, andnet8.0-windows10.0.19041.0target frameworks from both the MauiEmbeddingApp and MauiEmbeddingApp.MauiControls projects.Remove the
net8.0-maccatalysttarget framework from the MauiEmbeddingApp.Mobile project.Remove the
MauiEmbeddingApp.Windowsproject from the solution.Add the
GrailLicensefile to the MauiEmbeddingApp.MauiControls project as anEmbeddedResourceAdd the nuget.config file to the solution folder and make sure that the
packageSourceCredentialssection includes username and password. If you're missing credentials, go to the profile page in the admin portal and click on the Nuget tab where you can create credentials for your account.<?xml version="1.0" encoding="utf-8"?> <configuration> <packageSourceCredentials> <UXDivers> <add key="Username" value="[username]" /> <add key="ClearTextPassword" value="[password]" /> </UXDivers> </packageSourceCredentials> <packageSources> <clear /> <add key="nuget.org" value="https://api.nuget.org/v3/index.json" /> <add key="UXDivers" value="https://nuget.uxdivers.com/grial" /> </packageSources> </configuration>In the project file (csproj) for MauiEmbeddingApp.Mobile update the
ApplicationTitleandApplicationIdproperties with those retrieved earlier from the zip file.Expand out the MauiEmbeddingApp.Mobile project and locate the Main.Android.cs file. Change the Label property of the ApplicationAttribute from
@string/ApplicationNameto the ApplicationTitle retrieved earlier from the zip file.[global::Android.App.ApplicationAttribute( Label = "ApplicationTitle", Icon = "@mipmap/iconapp", LargeHeap = true, HardwareAccelerated = true, Theme = "@style/AppTheme" )] public class Application : Microsoft.UI.Xaml.NativeApplicationAdd a reference to the UXDivers.GrialMaui NuGet packages to the MauiEmbeddingApp.MauiControls project.
In the
AppBuilderExtensionsclass, update theUseMauiControlsextension method to call theGrialKit.InitandUseGrialmethods.using UXDivers.Grial; namespace MauiEmbeddingApp; public static class AppBuilderExtensions { public static MauiAppBuilder UseMauiControls(this MauiAppBuilder builder) { #if __IOS__ var theme = new ThemeColorsBase(new Dictionary<string, Color> { { "AccentColor", Color.FromArgb("#FF3F75FF") } }); GrialKit.Init(theme, "MauiEmbeddingApp.MauiControls.GrialLicense"); #else GrialKit.Init("MauiEmbeddingApp.MauiControls.GrialLicense"); #endif return builder .UseGrial() .ConfigureFonts(fonts => { fonts.AddFont("MauiEmbeddingApp/Assets/Fonts/OpenSansRegular.ttf", "OpenSansRegular"); fonts.AddFont("MauiEmbeddingApp/Assets/Fonts/OpenSansSemibold.ttf", "OpenSansSemibold"); }); } }
Adding a PieChart
The PieChart is one of many controls that's available in the Grial UI Kit. More information about the PieChart and other controls is available in the Grial UI Kit Documentation
Update the EmbeddedControl.xaml in the
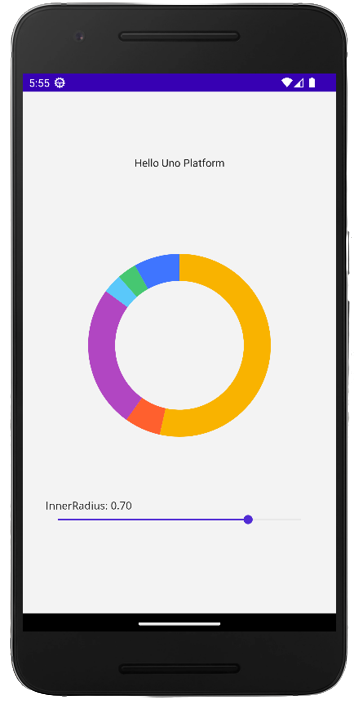
MauiEmbedding.MauiControlsproject with the following XAML that includes the PieChart<?xml version="1.0" encoding="utf-8" ?> <ContentView xmlns="http://schemas.microsoft.com/dotnet/2021/maui" xmlns:x="http://schemas.microsoft.com/winfx/2009/xaml" xmlns:toolkit="http://schemas.microsoft.com/dotnet/2022/maui/toolkit" xmlns:grial="http://uxdivers.com/grial" x:Class="MauiEmbeddingApp.MauiControls.EmbeddedControl" HorizontalOptions="Fill" VerticalOptions="Fill"> <ContentPage.Resources> <grial:ChartTheme x:Key="PieTheme"> <SolidColorBrush Color="#F9B300" /> <SolidColorBrush Color="#FF602E" /> <SolidColorBrush Color="#B146C2" /> <SolidColorBrush Color="#5AC8FA" /> <SolidColorBrush Color="#46C771" /> <SolidColorBrush Color="#3F75FF" /> </grial:ChartTheme> </ContentPage.Resources> <VerticalStackLayout Padding="30"> <grial:PieChart x:Name="chart" HeightRequest="400" BackgroundColor="Transparent" IsAnimated="False" LabelFontColor="DimGray" LabelFontSize="12" StrokeSize="0" Theme="{ StaticResource PieTheme }"> <grial:PieSeries InnerRadius="{ Binding Value, Source={x:Reference radius} }" ItemsSource="{ Binding . }" Radius="120" ValuePath="Value" /> </grial:PieChart> <Label Text="{Binding Value, Source={x:Reference radius}, StringFormat='InnerRadius: {0:F2}'}" /> <Slider Maximum=".9" Minimum="0" Value="0.8" x:Name="radius" /> </VerticalStackLayout> </ContentView>Update the EmbeddedControl.xaml.cs with the following code that sets the
BindingContextfor the chart (the PieChart) to be a basic set of data.namespace MauiEmbeddingApp.MauiControls; public partial class EmbeddedControl : ContentView { public EmbeddedControl() { InitializeComponent(); chart.BindingContext = new[] { new { Value = 521.02, }, new { Value = 62.56, }, new { Value = 245.52, }, new { Value = 33.26, }, new { Value = 33.26, }, new { Value = 78.95, } }; } }
App Render Output
Android:
iOS:

