How to create a simple feed
In this tutorial you will learn how to create an MVUX project and use a combination of a feed (IFeed<T>) and the FeedView control to load and display data coming from a service.
- The data will come from a service that asynchronously provides a single value of current weather information upon request.
- An IFeed will be created and used to asynchronously request data from the service.
- The
FeedViewcontrol will be used to display the data and automatically respond to the current feed status. - The
FeedViewwill be styled to use a different template when awaiting data from the service - A Refresh button will be added to retrieve the latest weather data on-demand.
Create the Model
Create an MVUX project by following the steps in this tutorial, and name the project WeatherApp
Add a class named WeatherService.cs, and replace its content with the following:
namespace WeatherApp;

public partial record WeatherInfo(int Temperature);

public interface IWeatherService
{
    ValueTask<WeatherInfo> GetCurrentWeather(CancellationToken ct);
}

public record WeatherService : IWeatherService
{
    public async ValueTask<WeatherInfo> GetCurrentWeatherAsync(CancellationToken ct)
    {
        // fake delay to simulate requesting data from a remote server
        await Task.Delay(TimeSpan.FromSeconds(2), ct);

        // assign a random number ranged -40 to 40.
        var temperature = new Random().Next(-40, 40);

        return new WeatherInfo(temperature);
    }
}
We're using a record for the
WeatherInfotype, as records are designed to be immutable, to ensure purity of objects, as well as other features.Create a class named WeatherModel.cs replacing its content with the following:
public partial record WeatherModel(IWeatherService WeatherService)
{
    public IFeed<WeatherInfo> CurrentWeather => Feed.Async(WeatherService.GetCurrentWeatherAsync);
}
Note
Feeds (
IFeed<T>andIListFeed<T>for collections) are used as a gateway to asynchronously request data from a service and wrap the result or error (if any) in metadata to be displayed in the View in accordingly.
Learn more about list-feeds here.
Data bind the View
WeatherModel exposes a CurrentWeather property which is an IFeed of type WeatherInfo.
This is similar in concept to an IObservable<T>, where an IFeed<T> represents a sequence of values.
Tip
An IFeed<T> is awaitable,
meaning that to get the value of the feed you would do the following in the model:
WeatherInfo currentWeather = await this.CurrentWeather;To make it possible to data bind to a feeds, the MVUX analyzers read the
WeatherModeland generate a proxy type calledBindableWeatherModel, which exposes properties that the View can data bind to.
Open the file
MainView.xamland replace thePagecontents with the following:<TextBlock Text="{Binding CurrentWeather.Temperature}" />Press F7 to navigate to open code-view, and in the constructor, after the line that calls
InitializeComponent(), add the following line:this.DataContext = new BindableWeatherModel(new WeatherService());Press F5 to run the app. The app will load with a default
WeatherInfovalue, with aTemperatureof0: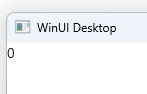
But then, after two seconds (the
GetCurrentWeatherAsyncmethod on theWeatherServiceincludes a 2 second delay before returning data), the value that came from the service will display: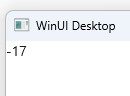
Note that this is a random value and may be different on your machine.
Note
It's worth noting that the CurrentWeather feed will only be invoked once, and the value captured in the bindable proxy.
The captured value will be returned to all binding expressions that use CurrentWeather.
This means that it's OK to use a lambda expression when defining the IFeed (=>), so that it can accessing the local WeatherService in Feed.Async(WeatherService.GetCurrentWeatherModel). The WeatherService property wouldn't have been available in a regular assignment context (=).
Using a FeedView
To this point, this is a similar binding experience you have most likely been familiar with using MVVM.
With the MVVM approach you would have to add error handling around the call to GetCurrentWeatherAsync,
you would need to expose properties on the ViewModel to indicate that data is loading,
and you would have to expose a method, or command, that can be invoked in order to refresh the data.
However, thanks to the metadata accompanied with each request handled by the IFeed,
MVUX is capable of much more than the simple example you've just seen.
In the next section we'll use the FeedView control to unlock the capabilities of the feed.
Now close the app and add the following namespace to the
MainView.xamlfile:xmlns:mvux="using:Uno.Extensions.Reactive.UI"Wrap the
TextBlockinside aFeedViewcontrol like the following:<mvux:FeedView Source="{Binding CurrentWeather}"> <DataTemplate> <TextBlock DataContext="{Binding Data}" Text="{Binding Temperature}" /> </DataTemplate> </mvux:FeedView>Notice how we set the
DataContextproperty to aDataproperty.
You can also simply set theTextproperty binding toData.Temperatureinstead, if you prefer.Tip
The
FeedViewwraps its source (in this case ourCurrentWeatherfeed) in aFeedViewStateobject, and makes the actual feed accessible via itsDataproperty.
TheFeedViewStatealso provides additional metadata properties as we'll soon see.Click F5 to run the project.
The temperature is requested from the service and is displayed on page: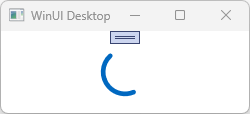
While the data is requested from the service, the
FeedViewautomatically displays a progress-ring (ProgressRing), as shown on the last screenshot.Once the data is the available, the
FeedViewwill show theDataTemplateabove, with theTextBlockdisplaying the value obtained from the service: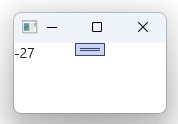
Close the app again and let's continue by adding a
Refreshbutton.
Change theFeedViewcontent to the following:<mvux:FeedView Source="{Binding CurrentWeather}"> <DataTemplate> <StackPanel> <TextBlock DataContext="{Binding Data}" Text="{Binding Temperature}" /> <Button Content="Refresh" Command="{Binding Refresh}" /> </StackPanel> </DataTemplate> </mvux:FeedView>Like the
Dataproperty, theRefreshproperty is a specialICommandcustomized to work asynchronously and invokes the service for refreshed data without blocking the UI.
It's also a property of theFeedViewStateclass mentioned earlier.Hit F5 again.
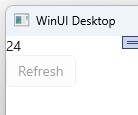
The progress-ring shows up while awaiting the data.
After a couple of seconds, once the data has been asynchronously received from the service, the above template takes places.
The temperature is now displayed accompanied by the Refresh button.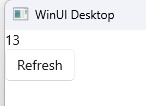
Click the Refresh button. You'll notice it disables instantly, and the progress-ring message is displayed thereafter.
After a couple of seconds the View will display the refreshed value the feed asynchronously retrieved from the service.
The
FeedViewalso gives you the ability to customize the various templates that are to be used according to the current state of the feed. In the following step you'll learn how to customize the progress-ring you saw before.Close the app and below the
DataTemplateabove, add the following content (within theFeedView):... </DataTemplate> <mvux:FeedView.ProgressTemplate> <DataTemplate> <TextBlock Text="Requesting temperature..."/> </DataTemplate> </mvux:FeedView.ProgressTemplate> </mvux:FeedView>When the app loads you'll notice how the custom
ProgressTemplatewe've just marked-up shows until the data is received from the service.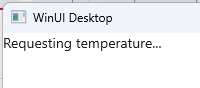
Once the data is the available and the
FeedViewswitches to itsValueTemplate(the first defaultDataTemplatein our example).