How to manually add a splash screen
Projects created using Uno Platform 4.8 or later have the Uno.Resizetizer package installed by default. Simply provide an SVG file, and the tool handles the task of generating various image sizes. That package updates the build process to automate configuring a splash screen for each platform.
While the new templates simplify adding a splash screen, this article covers how to add one to your application manually if using Uno.Resizetizer is not warranted.
Tip
If your solution was generated using the older templates, it is possible to configure these projects to use Uno.Resizetizer instead. That process makes the steps below unnecessary.
See the guide How-To: Get Started with Uno.Resizetizer for more information.
Step-by-step instructions
1. Shared splash screen image resources
Review Assets and image display to understand the present support for various image asset types
Prepare your images intended for the splash screen under different resolutions, eg:
File name Width Height SplashScreen.scale-100.png 216 148 SplashScreen.scale-125.png 270 185 SplashScreen.scale-150.png 324 222 SplashScreen.scale-200.png 432 296 SplashScreen.scale-300.png 648 444 SplashScreen.scale-400.png 864 592 Refer to this table to see values for the different scales required.
You can instead provide only a single image named
SplashScreen.pngwithout thescale-000qualifier.Note
Regardless if you provide a single image or multiple images, you would always refer to this image as
SplashScreen.png.
Add these images under the
Assets\folder of theMyAppproject, right-click on each image, go toProperties, and set their build action asContent.
2. Windows
In the
MyAppproject, open the filePackage.appxmanifestand navigate toVisual Assets > SplashScreen.Make sure the value for
Preview Images > Splash Screenis set toAssets\SplashScreen.png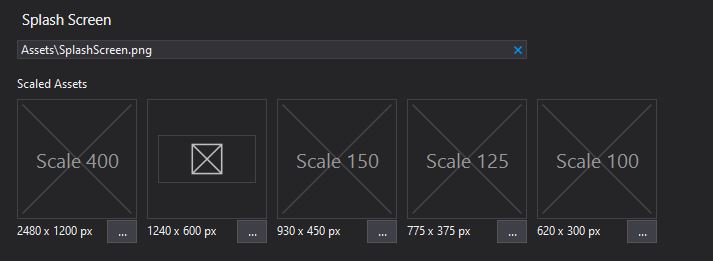
3. Android
In the
MyAppproject, open the subfolder forPlatforms/AndroidNavigate further to the file at
Resources/values/Styles.xmlStyles.xmlcontains Android-specific customizations for the splash screen. Inside, look for theAppThemestyle and add an<item>under it:<item name="android:windowBackground">@drawable/splash</item>Navigate upward to
Resources/drawable, and create a new XML file namedsplash.xml:<?xml version="1.0" encoding="utf-8"?> <layer-list xmlns:android="http://schemas.android.com/apk/res/android"> <item> <!-- background color --> <color android:color="#101010"/> </item> <item> <!-- splash image --> <bitmap android:src="@drawable/assets_splashscreen" android:tileMode="disabled" android:gravity="center" /> </item> </layer-list>Important
Before Uno.UI 4.5, the
@drawable/assets_splashscreensource should be@drawable/splashscreen. See the breaking changes section of that release.Make sure
splash.xmlis added as anAndroidResourcein the Droid project file:[Project-name].Droid.csproj.This is not always done automatically and may occur if
splash.xmlwas created and added outside the IDE.<ItemGroup> <AndroidResource Include="Resources\drawable\splash.xml" /> </ItemGroup>Tip
After modifying
splash.xml, you may run into errors like these while trying to debug:Resources\drawable-mdpi\SplashScreen.png : error APT2126: file not found. Resources\drawable-hdpi\SplashScreen.png : error APT2126: file not found.Simply rebuild the Android target to get rid of these errors.
4. iOS
In the
MyAppproject, open the subfolder forPlatforms/iOS- Delete the old splash screen files:
Resources\SplashScreen@2x.pngResources\SplashScreen@3x.pngLaunchScreen.storyboard
- Delete the old splash screen files:
Create a new StoryBoard named
LaunchScreen.storyboard:- Right-click the project subfolder you're working with (ex:
MyApp/Platforms/iOS) - Select Add > New Item...
- Create a Visual C# > Apple > Empty Storyboard
- Right-click the project subfolder you're working with (ex:
In the Toolbox window, drag and drop a View Controller and then an ImageView inside the View Controller
Enable the Is initial View Controller-flag on the View Controller.
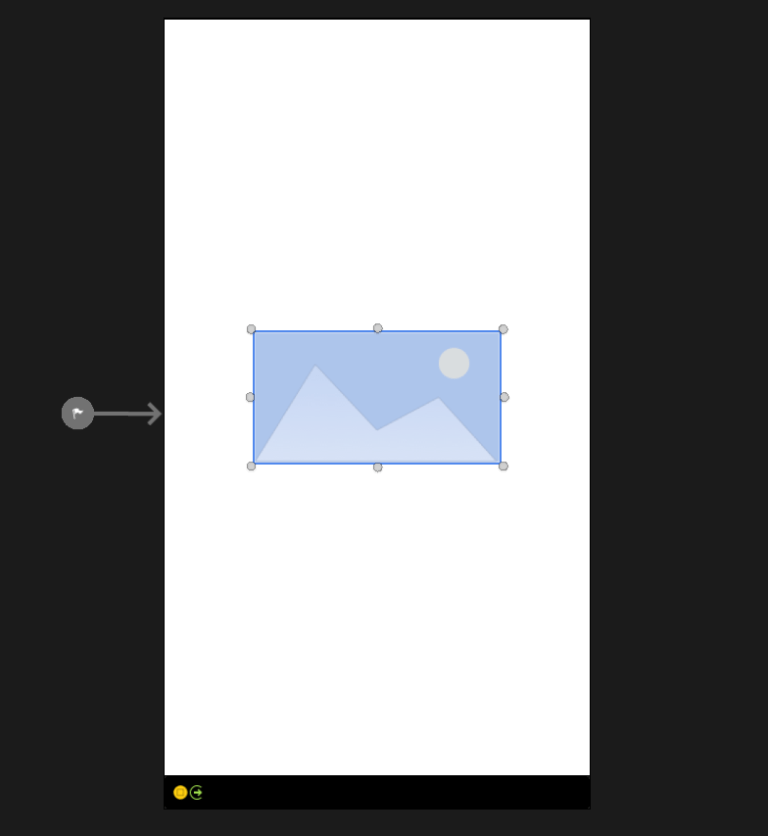
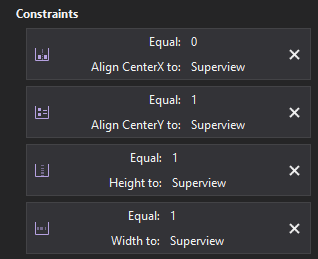
To have an image fill the screen, set your constraints as below
Set the Content Mode to Aspect Fit

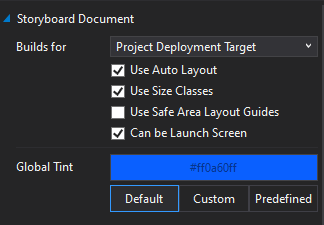
In the Properties > Storyboard Document window, select the Can be Launch Screen checkbox.
Close the designer and open the
.storyboardfile.Add your image path to the
Image View<imageView ... image="Assets/SplashScreen">
Open
info.plistand update theUILaunchStoryboardNamevalue toLaunchScreen.Tip
iOS caches the splash screen to improve the launch time, even across re-installs. In order to see the actual changes made, you need to restart the iPhone or simulator. Alternatively, you can rename the
CFBundleIdentifierininfo.plistincrementally (eg: MyApp1 -> MyApp2) before each build.
5. WebAssembly
The default splash screen configuration for WebAssembly is to use the Uno Platform logo as a placeholder.
An
Platforms/WebAssembly/WasmScript/AppManifest.jsfile contains some app settings, including properties to customize its splash screen. This file is found in theMyAppproject.
General properties
You can customize the splash screen image and background color by adjusting several key properties:
| Property | Description | Notes |
|---|---|---|
accentColor |
Color of the progress indicator's filled-in portion displayed during application launch | Default value is #F85977 |
displayName |
Default name visible in the browser window's title to represent the application | N/A |
splashScreenColor |
Background color of the screen displayed during application launch | Any values assigned to the theme-aware properties are ignored unless this property is set to transparent. If the theme-aware properties are unassigned, the default browser background color will be used instead. |
splashScreenImage |
Path to an image that will be visible on the screen displayed during application launch | You currently need to set an explicit scale for the image |
Tip
splashScreenColor allows you to maintain a background color regardless of the system theme. However, a simple method to make the splash screen theme-aware is to assign transparent as its value or by omitting that property altogether.
Theme-aware properties
Note
The section below contains optional properties. If nothing is assigned to them, the value of splashScreenColor will be used under both themes as the background color.
Uno Platform supports theme-aware backgrounds as an optional customization for splash screens. Set the following properties to adjust the splash screen based on a system theme:
| Property | Description | Notes |
|---|---|---|
lightThemeAccentColor |
Color of the progress indicator's filled-in portion displayed during application launch if a system light theme is enabled | Default value is #F85977 |
darkThemeAccentColor |
Color of the progress indicator's filled-in portion displayed during application launch if a system dark theme is enabled | Default value is #F85977 |
lightThemeBackgroundColor |
Background color of the screen displayed during application launch if a system light theme is enabled | Default value is #F3F3F3 |
darkThemeBackgroundColor |
Background color of the screen displayed during application launch if a system dark theme is enabled | Default value is #202020 |
Code example:
var UnoAppManifest = {
    splashScreenImage: "Assets/SplashScreen.scale-200.png",
    splashScreenColor: "transparent",
    displayName: "SplashScreenSample"
}