Create an app
This section will guide you through the process of creating a new app using the Uno Platform Figma Plugin and the Example App present by default in the Uno Platform Material Toolkit file, using the Uno Platform Figma Plugin.
Important
This page is assuming that the Design to Code section has been completed.
Development environment (Visual Studio or your favorite IDE)
Creating a new project using the Uno Platform requires a developer environment to be setup. For more information about setting up your development environment, see Get Started with Uno Platform.
Create a project
This simple tutorial will create a new project using the unoapp template. It uses the blank template augmented with Uno Material, Uno Toolkit, MVUX, and Navigation using the XAML UI language.
Run the following command in a terminal to create a new project:
dotnet new unoapp -preset blank -theme "material" -presentation "mvux" -di -nav "regions" -toolkit true -o MyFirstAppFromFigma
Following steps will use Visual Studio, but any other IDE should work as well with minimal changes.
Step 1 - Open the solution, compile and run it
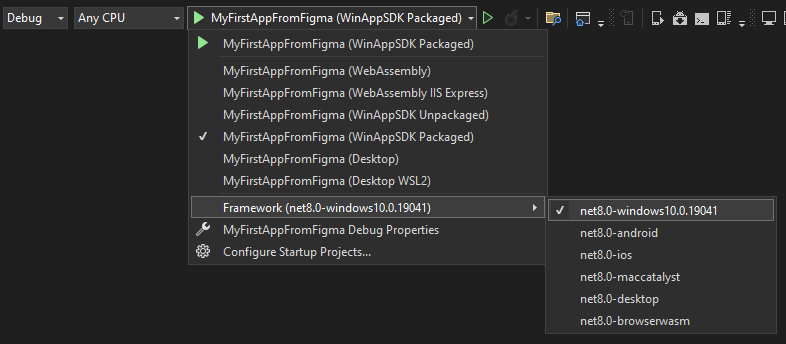
Open the generated
MyFirstAppFromFigma.slnsolution in your favorite IDE.In the Debug toolbar, select your preferred platform as the startup project. For more detailed instructions specific to each platform, refer to the Debug the App documentation.
Press F5 to run the app and ensure it builds correctly.
Locate the page
MainPage.xamlinside thePresentationfolder in theMyFirstAppFromFigmalibrary project.Compile the project to ensure it builds correctly.
Switch to Figma (next section).
Step 2 - Make Figma generates the right XAML
- Go back to Figma, in the document you created in the Design to Code section.
- Open the plugin (more details in the Setup section)
- In Figma, select the 01. Login frame
- In the plugin, navigate to the Properties tab
- In the Page Name field, write
MainPage - Navigate to the Application subtab
- In the Application Namespace field, write
MyFirstAppFromFigma - In the Views Sub Namespace field, write
Presentation - Go back to the Export tab
- Click on the Refresh button
- Now click on the Copy button to copy the generated XAML to the clipboard
Step 3 - Paste the generated XAML into app project
- Go back to your IDE (Visual Studio in this example)
- Replace the content of the
MainPage.xamlfile with the generated XAML, from the clipboard - Press F5 to run the app
Additional notes
Here is another example in this video, demonstrating the use of Figma Plugin Generated C# Markup in an Uno Platform project:
For additional content, explore our [Uno Platform for Figma Plugin - Get Started Series] (https://www.youtube.com/playlist?list=PLl_OlDcUya9qcdp4SYlEdccD7tIYgb1re).
Next steps
This tutorial has shown you how to create a new app using the Uno Platform Figma Plugin and the Example App present in the Uno Material Toolkit Figma document.
Use this documentation to understand how to use the plugin to generate code from your own Figma document.