How to create a state with a command
UnoFeatures:
MVUX(add to<UnoFeatures>in your.csproj)
In this tutorial, you will learn how to create an MVUX project and basic usage of a state (IState<T>) and the FeedView control, to asynchronously load, display and manipulate data from and to an service.
- The data is provided by a service that asynchronously retrieves and updates a single value that determines the crowdedness of a wedding hall, via a 'remote' service.
- A State to asynchronously request and update the data from and to the service.
- The
FeedViewcontrol will be used to display the data and automatically respond to the current State status. - See how MVUX generates commands and learn how to react to them in the Model.
WeddingHallApp Sample
You can find the code for our weather app here.
Create the Model
Create an MVUX project by following the steps in this tutorial, and name your project
TheFancyWeddingHall.Add a class named HallCrowdednessService.cs, and replace its content with the following:
namespace TheFancyWeddingHall;

public partial record HallCrowdedness(int NumberOfPeopleInHall);

public interface IHallCrowdednessService
{
    ValueTask<HallCrowdedness> GetHallCrowdednessAsync(CancellationToken ct);
    ValueTask SetHallCrowdednessAsync(HallCrowdedness crowdedness, CancellationToken ct);
}

public class HallCrowdednessService : IHallCrowdednessService
{
    // a service is normally stateless
    // the local field is for the purpose of this demo
    private int _numberOfPeopleInHall = 5;

    public async ValueTask<HallCrowdedness> GetHallCrowdedness(CancellationToken ct)
    {
        // fake "loading from server"
        await Task.Delay(TimeSpan.FromSeconds(1));
        var result = new HallCrowdedness(_numberOfPeopleInHall);

        return result;
    }

    public async ValueTask SetHallCrowdedness(HallCrowdedness crowdedness, CancellationToken ct)
    {
        // fake "updating server"
        await Task.Delay(TimeSpan.FromSeconds(1));
        _numberOfPeopleInHall = crowdedness.NumberOfPeopleInHall;
    }
}
We're using a record for the
HallCrowdednessentity type on purpose, as records are designed to be immutable to ensure purity of objects as well as other features.Create a class named HallCrowdednessModel.cs and replace its content with the following:
using Uno.Extensions.Reactive;

namespace TheFancyWeddingHall;

public partial record HallCrowdednessModel(IHallCrowdednessService HallCrowdednessService)
{
    public IState<HallCrowdedness> HallCrowdedness => State.Async(this, HallCrowdednessService.GetHallCrowdedness);

    public async ValueTask Save(CancellationToken ct)
    {
        var updatedCrowdedness = await HallCrowdedness;

        if(updatedCrowdedness is null)
        {
            return;
        }

        await HallCrowdednessService.SetHallCrowdedness(updatedCrowdedness, ct);
    }
}
Note
Feeds and States (
IState<T>andIListState<T>for collections) are both used as a gateway to asynchronously request data from a service and wrap the result or error (if any) in metadata to be displayed in the View in accordingly. However, unlike a Feed, a State, as its name suggests, is stateful. While a Feed is just a query of a stream of data, a State also implies an up-to-date value that represents the current state of the application that can be accessed and updated.Tip
Unlike feeds, States require a reference to the owner type which is used to store and manage the state of the model. In addition, by having a reference to the owner, we link the lifetime of the model with its owner, and the State is ready to be collected by the Garbage Collector as soon as its owner is disposed.
Data bind the View
The HallCrowdedness property in HallCrowdednessModel, is an IState of type HallCrowdedness.
This is similar in concept to an IObservable<HallCrowdedness>, where an IState<HallCrowdedness> represents a sequence of values, with access to the additional metadata.
The difference of States is that they provide update operators and enable manipulating the data, as opposed to Feeds, which doesn't.
Tip
An IFeed<T> as well as IState<T> are awaitable, meaning that to get the value of the feed you would do the following in the model:
HallCrowdedness hallCrowdedness = await this.HallCrowdedness;
Replace anything inside the
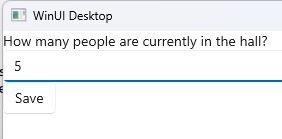
Pageelement with the following code:<StackPanel> <TextBlock Text="How many people are currently in the hall?" /> <TextBox DataContext="{Binding HallCrowdedness}" Text="{Binding NumberOfPeopleInHall, Mode=TwoWay, UpdateSourceTrigger=PropertyChanged}" /> </StackPanel>When the user edits the text in the
TextBox, MVUXs data-binding adapters translate between the data-binding into updating theHallCrowdednessstate, by recreating the wholeHallCrowdednessentity (it's immutable) with the changedNumberOfPeopleInHallvalue that was received per theTextBoxedit.
MVUX commands
In the
Savemethod above, place a breakpoint on the lineawait _hallCrow...SetHallCrowd..., for later use:
MVUX's analyzers will read the
HallCrowdednessModeland will generate a special ViewModel calledHallCrowdednessViewModel, which provides binding capabilities for the View and performs all Update message for us, to keep theIStateup to date.In addition, MVUX reads the
Savemethod, and generates in the ViewModel a command namedSavethat can be used from the View, which is invoked asynchronously.In the XAML file, after the
TextBox, add the followingButtoncode:<TextBox ... /> <Button Content="Save" Command="{Binding Save}" /> </StackPanel>The generated
Savecommand is used as the button'sCommandproperty, so that when the user clicks the button, the command is executed and the call is directed to theSavemethod in the Model.Tip
A
CancellationTokenis automatically provided by the View and can be used in advanced scenarios, and is recommended to use although it's optional.Press F7 to navigate to open code-view, and in the constructor, after the line that calls
InitializeComponent(), add the following line:this.DataContext = new HallCrowdednessViewModel(new HallCrowdednessService());The
HallCrowdednessViewModelis a special MVUX-generated ViewModel bindable proxy class that represents a mirror of theHallCrowdednessModeladding binding capabilities, for MVUX to be able to recreate and renew the model when an update message is sent by the view.Click F5 to run the project
The app will load with its default value '5' as the number of people.

Change the number to 15 and click 'Save'.
The debugger will stop at the breakpoint you placed earlier.

As you can see, the current value of the state has gotten the updated number '15'. This is now being saved to the service, in the following line execution once you hit F5 again.