How-To: Display a Message Dialog
This topic walks through using Navigation to display a prompt using a MessageDialog. This can also be used for simple user interactions, such as a confirmation dialog, where the user is prompted with an Ok/Cancel, or Yes/No, question.
Step-by-steps
Important
This guide assumes you used the template wizard or dotnet new unoapp to create your solution. If not, it is recommended that you follow the instructions for creating an application from the template.
1. Show an ad-hoc MessageDialog
Update the existing
ButtononMainPage.xaml<Button Content="Show Simple Message Dialog" Click="{x:Bind ViewModel.ShowSimpleDialog}" Grid.Row="1" HorizontalAlignment="Center" VerticalAlignment="Center" />Add
ShowSimpleDialogmethod toMainViewModelpublic async Task ShowSimpleDialog() { _ = _navigator.ShowMessageDialogAsync(this, title: "This is Uno", content: "Hello Uno.Extensions!"); }Run the application to see a
MessageDialogdisplayed when you click theButton.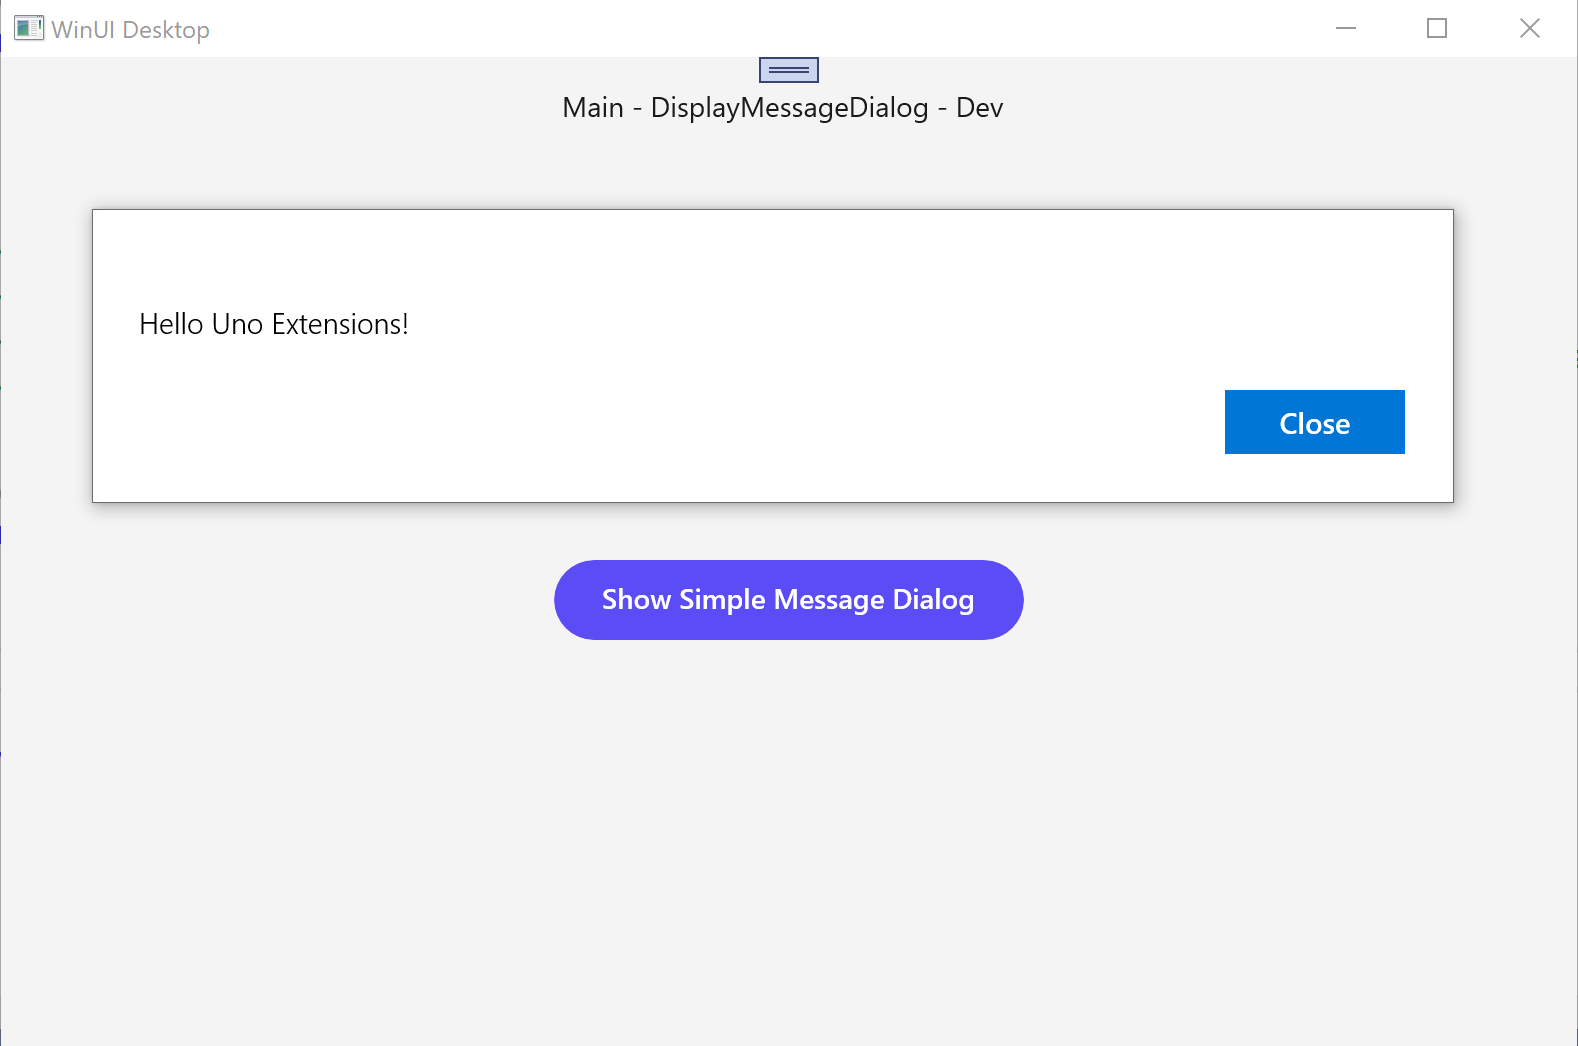
2. Accessing the MessageDialog response
Change code in the
ShowSimpleDialogmethod to await responsepublic async Task ShowSimpleDialog() { var result = await _navigator.ShowMessageDialogAsync<string>(this, title: "This is Uno", content: "Hello Uno.Extensions!"); }Modify the
ShowMessageDialogAsyncmethod call to specify multiple buttons.public async Task ShowSimpleDialog() { var result = await _navigator.ShowMessageDialogAsync<string>(this, title: "This is Uno", content: "Hello Uno.Extensions!", buttons: new[] { new DialogAction("Ok"), new DialogAction("Cancel") }); }The
resultvariable will be set to the label of the selected button.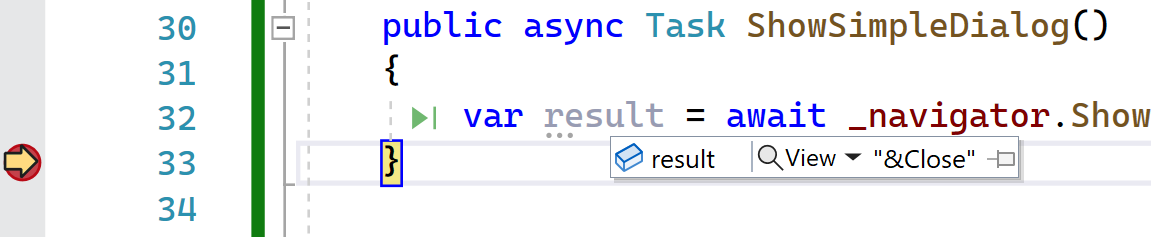
3. Using predefined MessageDialog
If you want to use the same MessageDialog in different places in your application you can define a MessageDialogViewMap and then reference it by the route you assign to it.
Create a
MessageDialogViewMapinstance and register it with bothviewsandroutesinApp.xaml.host.csprivate static void RegisterRoutes(IViewRegistry views, IRouteRegistry routes) { var messageDialog = new MessageDialogViewMap( title: "This is Uno", Content: "Hello Uno.Extensions", Buttons: new[] { new DialogAction(Label:"Yes"), new DialogAction(Label:"No") } ); views.Register( new ViewMap<ShellControl,ShellViewModel>(), new ViewMap<MainPage, MainViewModel>(), new ViewMap<SecondPage, SecondViewModel>(), messageDialog ); routes .Register( new RouteMap("", View: views.FindByViewModel<ShellViewModel>() , Nested: new RouteMap[] { new RouteMap("Main", View: views.FindByViewModel<MainViewModel>()), new RouteMap("Second", View: views.FindByViewModel<SecondViewModel>()), new RouteMap("MyMessage", View: messageDialog) })); }In
MainViewModelchange theShowMessageDialogAsyncmethod to specify therouteargument, which should be the route specified in the theRouteMapvar result = await _navigator.ShowMessageDialogAsync<string>(this, route: "MyMessage");
4. Localize the MessageDialog
For a localized
MessageDialogcreate aLocalizableMessageDialogViewMapinstance and register it with bothviewsandroutes(as per previous step). Note that each of the properties in theLocalizableMessageDialogViewMapthat were a simplestringin theMessageDialogViewMap, are now call-back methods that provide anIStringLocalizerinstance.var localizedMessageDialog = new LocalizableMessageDialogViewMap( Content: localizer => localizer?["MyDialog_Content"]??string.Empty, Buttons: new[] { new LocalizableDialogAction( LabelProvider:localizer=>localizer?["Dialog_Ok"]??string.Empty), new LocalizableDialogAction( LabelProvider:localizer=>localizer?["Dialog_Cancel"]??string.Empty) } );Add resources for
MyDialog_Content,Dialog_OkandDialog_CanceltoResources.resw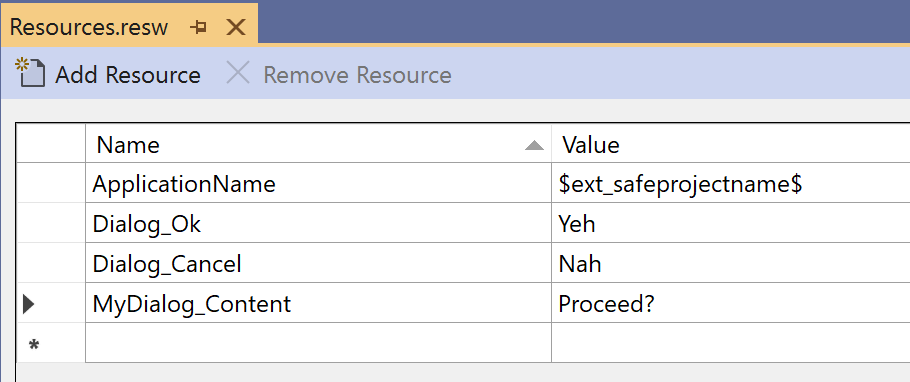
Make sure the
UseLocalizationextension method is called in theBuildAppHostmethod inApp.xaml.host.csprivate static IHost BuildAppHost() { return UnoHost .CreateDefaultBuilder() // ... omitted for brevity .UseLocalization() .Build(enableUnoLogging: true); }In
MainViewModelchange theShowMessageDialogAsyncmethod to use theMyLocalizedMessageroute (this route should match the name of the route that was added to theroutesearlier).var result = await _navigator.ShowMessageDialogAsync<string>(this, route: "MyLocalizedMessage");