Counter App using Reactor
Note
Estimated time to complete: 5 minutes
Introduction
This tutorial will walk you through creating a simple counter application with Uno Platform. The application will have a Button that increments the counter, a TextBox where the user can enter the step size, and a TextBlock that displays the current value of the counter.
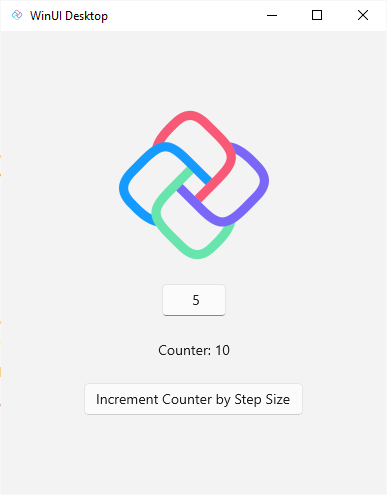
In this tutorial, you will learn how to:
- Create a new project with Uno Platform using the dotnet new command
- Describe the layout of the application in C#, using Reactor components
- Keep the application's state in the component with
UseState, and update the UI when it changes
To complete this tutorial, you don't need any prior knowledge of the Uno Platform or C#.
Note
Reactor support is in preview and requires Uno Platform 7.0 or later.
Create the Application
The Reactor template is available from the command line. It comes with the Uno Platform 7.0 templates: until 7.0 is released, a plain dotnet new install Uno.Templates installs the stable templates, which don't include it, so name a 7.0 version (this one or a later one):
dotnet new install Uno.Templates@7.0.0-dev.161
For more about the templates, see dotnet new templates for Uno Platform.
Then run the following command:
dotnet new unoapp-reactor -o Counter
This will create a new folder called Counter containing the new application. You can open it in Visual Studio Code, Rider, or your preferred editor.
Program and MainComponent
The application is a single project, named Counter, that targets Android, iOS, WebAssembly and desktop. Most of it is in two files.
Program.cs is the entry point of the application. Reactor creates the application and its window, and shows the MainComponent:
ReactorApp.Run<MainComponent>("Counter", width: 480, height: 360);
MainComponent.cs defines what the application shows:
using Microsoft.UI.Reactor;
using Microsoft.UI.Reactor.Core;
using static Microsoft.UI.Reactor.Factories;

namespace Counter;

public class MainComponent : Component
{
    public override Element Render()
    {
        var (count, setCount) = UseState(0);

        return VStack(12,
            Heading($"Count: {count}"),
            HStack(8,
                Button("-", () => setCount(count - 1)),
                Button("+", () => setCount(count + 1))
            )
        ).Padding(24);
    }
}
The Render() method returns a description of the UI. VStack lays out its children in a vertical stack, 12 pixels apart, and HStack does the same horizontally. Heading and Button display a text and a button. These functions come from Microsoft.UI.Reactor.Factories, and each one stands for a WinUI control or panel.
Run the application before going further:
cd Counter
dotnet run -f net10.0-desktop
You can also use -f net10.0-browserwasm to run it in the browser, -f net10.0-android to run it on a connected Android device or emulator, or -f net10.0-ios to run it in the iOS Simulator on a Mac.
We're going to replace the template's content with our own counter, one step at a time.
Add a Control
We're going to replace the content of the VStack with an Image, but before we can do this, we need to add the image file to the application. Download this SVG image and add it to the Assets folder.

All the files in the Assets folder are processed by Uno.Resizetizer, which converts SVG files to a PNG file for each platform. For more information, see Get Started with Uno.Resizetizer.
Open the MainComponent.cs file.
Add
using Microsoft.UI.Xaml;to theusingdirectives at the top of the file. We'll use it for alignment values.Replace the content of the
Render()method with the following code:return VStack(12, Image("ms-appx:///Assets/logo.png") .Size(150, 150) .HAlign(HorizontalAlignment.Center) ).VAlign(VerticalAlignment.Center);
The Image shows the PNG file generated from the SVG, and .Size(150, 150) displays it at 150×150 pixels. .HAlign and .VAlign set the horizontal and vertical alignment, so the image is displayed in the center of the window.
Run the application again to see the image.
Add the Other Controls
Let's add the remaining controls for the counter, below the image. Each one is centered horizontally.
Add a
TextBoxto allow the user to enter the step size.TextBox(placeholderText: "Step Size") .TextAlignment(TextAlignment.Center) .HAlign(HorizontalAlignment.Center),Add a
TextBlockto display the current counter value.TextBlock("Counter: 0") .TextAlignment(TextAlignment.Center) .HAlign(HorizontalAlignment.Center),Add a
Buttonto increment the counter.Button("Increment Counter by Step Size") .HAlign(HorizontalAlignment.Center)Remember to add a
,after theImage, so that theRender()method looks like this:return VStack(12, Image("ms-appx:///Assets/logo.png") .Size(150, 150) .HAlign(HorizontalAlignment.Center), TextBox(placeholderText: "Step Size") .TextAlignment(TextAlignment.Center) .HAlign(HorizontalAlignment.Center), TextBlock("Counter: 0") .TextAlignment(TextAlignment.Center) .HAlign(HorizontalAlignment.Center), Button("Increment Counter by Step Size") .HAlign(HorizontalAlignment.Center) ).VAlign(VerticalAlignment.Center);
Add State
So far, all the controls display fixed content. To make the counter work, the component needs to remember two values: the current count, and the step size entered by the user.
In Reactor, a component keeps its values with UseState. It returns the current value and a function that changes it. When the value changes, Reactor calls Render() again and updates the controls that display it.
At the start of the
Render()method, add the two values. The step size is kept as the text entered by the user, and it starts at"1".var (count, setCount) = UseState(0); var (step, setStep) = UseState("1");Update the
TextBoxto show thestepvalue, and to callsetStepwhen the user changes the text.TextBox(step, setStep, placeholderText: "Step Size") .TextAlignment(TextAlignment.Center) .HAlign(HorizontalAlignment.Center),Update the
TextBlockto display thecountvalue.TextBlock($"Counter: {count}") .TextAlignment(TextAlignment.Center) .HAlign(HorizontalAlignment.Center),Update the
Buttonto increase the count by the step size when it's clicked. If the text isn't a number, the count doesn't change.Button("Increment Counter by Step Size", () => { if (int.TryParse(step, out var stepSize)) { setCount(count + stepSize); } }) .HAlign(HorizontalAlignment.Center)The final code for MainComponent.cs should look like this:
using Microsoft.UI.Reactor;
using Microsoft.UI.Reactor.Core;
using Microsoft.UI.Xaml;
using static Microsoft.UI.Reactor.Factories;

namespace Counter;

public class MainComponent : Component
{
    public override Element Render()
    {
        var (count, setCount) = UseState(0);
        var (step, setStep) = UseState("1");

        return VStack(12,
            Image("ms-appx:///Assets/logo.png")
                .Size(150, 150)
                .HAlign(HorizontalAlignment.Center),
            TextBox(step, setStep, placeholderText: "Step Size")
                .TextAlignment(TextAlignment.Center)
                .HAlign(HorizontalAlignment.Center),
            TextBlock($"Counter: {count}")
                .TextAlignment(TextAlignment.Center)
                .HAlign(HorizontalAlignment.Center),
            Button("Increment Counter by Step Size", () =>
            {
                if (int.TryParse(step, out var stepSize))
                {
                    setCount(count + stepSize);
                }
            })
                .HAlign(HorizontalAlignment.Center)
        ).VAlign(VerticalAlignment.Center);
    }
}
Wrap Up
At this point, you should have a working counter application. Try changing the step size and clicking the button to increment the counter.
To learn more about Reactor, see Using Reactor.