Authentication using OpenID Connect
OpenID Connect is a layer over OAuth 2.0, allowing a simpler integration into applications, especially when the OpenID Connect Discovery is used.
This article will document the usage of IdentityModel.OidcClient into an Uno application using the WebAuthenticationBroker. You can find more in the IdentityModel.OidcClient documentation.
The code of this article can be found in the Uno Samples GitHub repository.
Limitations
- Platforms: The
WebAuthenticationBrokeris not supported on all platforms yet. For Uno 3.6 it is implemented only on WebAssembly, Android, iOS and macOS. - Return URI on WebAssembly: Because of browser security restrictions, on WebAssembly, the return URL must be on the same origin as the application. On other platforms the best approach is to use a custom protocol scheme (like
my-application:). For most applications, you may simply use the automatic discovery of return URLs, which will use theWebAuthenticationBroker.GetCurrentApplicationCallbackUri()method. - Browser Anti-Popup Protection: On WebAssembly, a foreign/public web site is usually used to authenticate the user. Doing this without losing the application context requires the opening of a new browser window. To ensure the window will open on all browsers without being denied, this new window must be opened using the handling of a user interaction. For this reason the IdentityModel.OidcClient's automatic mode can't be used because it's doing async processing (fetching the discovery endpoint) before opening the authentication browser.
Demo Endpoint
This code uses the IdentityServer demonstration endpoint with the following parameters:
| Field | Value |
|---|---|
| Authority | https://demo.duendesoftware.com/ |
| ClientId | interactive.confidential |
| Secret | secret |
| Scopes | openid profile email api offline_access |
Note: this endpoint allows any return URIs. It's acceptable for demo purposes, but production application will usually requires to register return addresses.
Step 0 - Install Uno + Create an Application
Please refer to the Getting Started documentation to install Uno and create a new application. For the sample below, an application named OidcDemo has been created.
For platforms supporting it, the custom protocol "oidc-auth:" will be used.
Step 1 - Add Reference to OidcClient package
Add the package IdentityModel.OidcClient to all relevant head projects of the solution.
Step 2 - Prepare for Return Uri
Android
Add the following class in the project of the Android Head.
[Activity(NoHistory = true, LaunchMode = LaunchMode.SingleTop, Exported = true)]
[IntentFilter(
    new[] {Android.Content.Intent.ActionView},
    Categories = new[] {Android.Content.Intent.CategoryDefault, Android.Content.Intent.CategoryBrowsable},
    DataScheme = "oidc-auth")]
public class WebAuthenticationBrokerActivity : WebAuthenticationBrokerActivityBase
{
}
Note the [Activity] attribute needs to include Exported = true if you are targeting Android 12.
This activity will intercept the return URI and forward it to any waiting WebAuthenticationBroker.
Note: it's using the system browser. Check the WebAuthenticationBroker documentation to use another mechanism.
iOS & macOS
Add the oidc-auth: custom scheme in Info.plist file.
<key>CFBundleURLTypes</key>
<array>
 <dict>
  <key>CFBundleURLName</key>
  <string>Authentication Callback</string>
  <key>CFBundleURLSchemes</key>
  <array>
   <string>oidc-auth</string>
  </array>
 </dict>
</array>
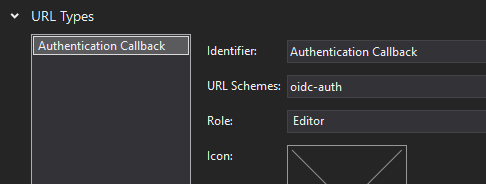
Alternatively, you can use the editor integrated in Visual Studio to set it, in the advanced tab:
WinUI
There's nothing special for WinUI. Any return URI will work. You can force it to oidc-auth: if you want, but you won't have any special registration to do to support it.
WebAssembly
There's nothing special for WASM. The default return Uri of the platform (WebAuthenticationBroker.GetCurrentApplicationCallbackUri()) will work with this sample and will default to <origin>/authentication-callback. It should be something like http://localhost:5000/authentication-callback when running locally using Kestrel.
Step 3 - Prepare the UI
Add the following lines in your application, in [Project-name]/MainPage.xaml:
<!--Add this line with the other dependencies-->
xmlns:toolkit="using:Uno.UI.Toolkit"

<!--This will replace the initial Grid-->
<Border toolkit:VisibleBoundsPadding.PaddingMask="All">
    <StackPanel Spacing="10" Margin="10">
        <StackPanel Orientation="Horizontal" Spacing="5">
            <Button Click="SignIn_Clicked" x:Name="btnSignin" IsEnabled="False">Sign In</Button>
            <Button Click="SignOut_Clicked" x:Name="btnSignout" IsEnabled="False">Sign Out</Button>
        </StackPanel>
        <TextBlock x:Name="txtAuthResult" />
    </StackPanel>
</Border>
Step 4 - Prepare the Requesting Code
Add the following code to the main page of your application:
//add this namespace on top of the class
using IdentityModel.OidcClient;

// Put this code in the class of MainPage.xaml.cs
private OidcClient _oidcClient;
private AuthorizeState _loginState;
private Uri _logoutUrl;

public MainPage()
{
    this.InitializeComponent();
    PrepareClient();
}

private async void PrepareClient()
{
    var redirectUri = WebAuthenticationBroker.GetCurrentApplicationCallbackUri().OriginalString;

    // Create options for endpoint discovery
    var options = new OidcClientOptions
    {
        Authority = "https://demo.duendesoftware.com/",
        ClientId = "interactive.confidential",
        ClientSecret = "secret",
        Scope = "openid profile email api offline_access",
        RedirectUri = redirectUri,
        PostLogoutRedirectUri = redirectUri,
    };

    // Create the client. In production application, this is often created and stored
    // directly in the Application class.
    _oidcClient = new OidcClient(options);

    // Invoke Discovery and prepare a request state, containing the nonce.
    // This is done here to ensure the discovery mechanism is done before
    // the user clicks on the SignIn button. Since the opening of a web window
    // should be done during the handling of a user interaction (here it's the button click),
    // it will be too late to reach the discovery endpoint.
    // Not doing this could trigger popup blocker mechanisms in browsers.
    _loginState = await _oidcClient.PrepareLoginAsync();
    btnSignin.IsEnabled = true;

    // Same for logout url.
    _logoutUrl = new Uri(await _oidcClient.PrepareLogoutAsync(new LogoutRequest()));
    btnSignout.IsEnabled = true;
}
Step 5 - Proceed to Authentication
Add following button handlers:
private async void SignIn_Clicked(object sender, RoutedEventArgs e)
{
    var startUri = new Uri(_loginState.StartUrl);

    // Important: there should be NO await before calling .AuthenticateAsync() - at least
    // on WebAssembly, in order to prevent triggering the popup blocker mechanisms.
    var userResult = await WebAuthenticationBroker.AuthenticateAsync(WebAuthenticationOptions.None, startUri);

    if (userResult.ResponseStatus != WebAuthenticationStatus.Success)
    {
        txtAuthResult.Text = "Canceled";
        // Error or user cancellation
        return;
    }

    // User authentication process completed successfully.
    // Now we need to get authorization tokens from the response
    var authenticationResult = await _oidcClient.ProcessResponseAsync(userResult.ResponseData, _loginState);

    if (authenticationResult.IsError)
    {
        var errorMessage = authenticationResult.Error;
        // TODO: do something with error message
        txtAuthResult.Text = $"Error {errorMessage}";
        return;
    }

    // That's completed. Here you have to token, ready to do something
    var token = authenticationResult.AccessToken;
    var refreshToken = authenticationResult.RefreshToken;

    // TODO: make something useful with the tokens
    txtAuthResult.Text = $"Success, token is {token}";
}

private async void SignOut_Clicked(object sender, RoutedEventArgs e)
{
    // Important: there should be NO await before calling .AuthenticateAsync() - at least
    // on WebAssembly, in order to prevent triggering the popup blocker mechanisms.
    await WebAuthenticationBroker.AuthenticateAsync(WebAuthenticationOptions.None, _logoutUrl);
}
Step 6 - Finalize & Compile
Important
On WebAssembly, it's important to configure the linker to prevent the removal of some important part of the OIDC Connect client library:
LinkerConfig.xml:
<linker>
  <assembly fullname="My.Oidc.Client.App.Wasm" />
  <assembly fullname="Uno.UI" />

  <!-- ADD THE FOLLOWING 2 LINES -->
  <assembly fullname="IdentityModel" />
  <assembly fullname="System.IdentityModel.Tokens.Jwt" />

  <assembly fullname="System.Net.Http" />

  <assembly fullname="System.Core">
 <!-- This is required by JSon.NET and any expression.Compile caller -->
 <type fullname="System.Linq.Expressions*" />
  </assembly>
</linker>
Now compile & Run!