Embedding Existing JavaScript Components in Uno Platform - Part 2
Let's create an app to integrate a Syntax Highlighter named PrismJS. This library is simple and is self-contained - there's no external dependencies.
Integration of PrismJS in a project
0. Before starting
📝 To reproduce the code in this article, you must prepare a development environment using Uno's Getting Started article.
1. Create the projects
🎯 This section is very similar to the Create a Counter App with Uno Platform tutorial in the official documentation.
Create a new Uno Platform App project using one of the getting started blank or recommended presets.
2. Create a control in managed code
🎯 In this section, a control named PrismJsView is created in code and used in the XAML page (MainPage.xaml) to present it.
From the
[MyApp]project, create a new class file namedPrismJsView.cs. and copy the following code:using System; using System.Collections.Generic; using System.Text; using Uno.Foundation; using Uno.UI.Runtime.WebAssembly; namespace PrismJsDemo; using Uno.UI.NativeElementHosting; namespace PrismJsDemo; class PrismJsView : ContentControl { private BrowserHtmlElement? _element; // ************************* // * Dependency Properties * // ************************* public static readonly DependencyProperty CodeProperty = DependencyProperty.Register( nameof(Code), typeof(string), typeof(PrismJsView), new PropertyMetadata(default(string), CodeChanged)); public string Code { get => (string)GetValue(CodeProperty); set => SetValue(CodeProperty, value); } public static readonly DependencyProperty LangProperty = DependencyProperty.Register( "Lang", typeof(string), typeof(PrismJsView), new PropertyMetadata(default(string), LangChanged)); public string Lang { get => (string)GetValue(LangProperty); set => SetValue(LangProperty, value); } // *************** // * Constructor * // *************** public PrismJsView() { _element = BrowserHtmlElement.CreateHtmlElement("code"); Content = _element; } // ****************************** // * Property Changed Callbacks * // ****************************** private static void CodeChanged(DependencyObject dependencyobject, DependencyPropertyChangedEventArgs args) { // TODO: generate HTML using PrismJS here } private static void LangChanged(DependencyObject dependencyobject, DependencyPropertyChangedEventArgs args) { // TODO: generate HTML using PrismJS here } }This will define a control having 2 properties, one code
Codeand another one forLang.Change the
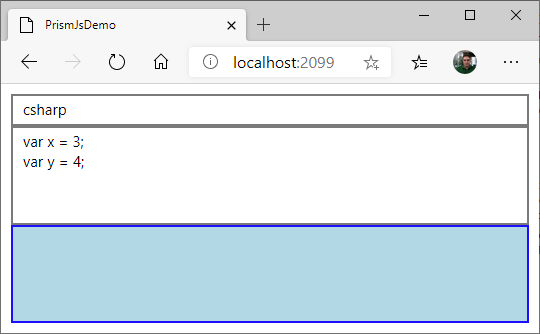
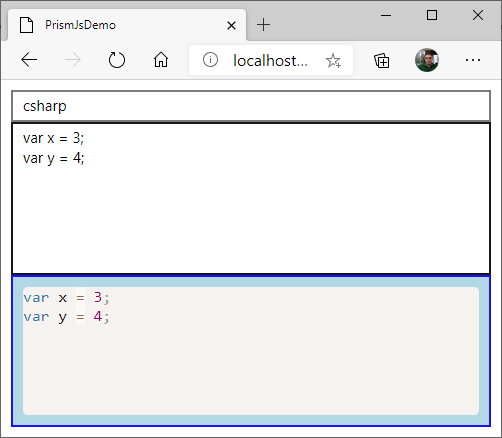
MainPage.xamlfile to the following content:<Page x:Class="PrismJsDemo.MainPage" xmlns="http://schemas.microsoft.com/winfx/2006/xaml/presentation" xmlns:x="http://schemas.microsoft.com/winfx/2006/xaml" xmlns:local="using:PrismJsDemo" xmlns:d="http://schemas.microsoft.com/expression/blend/2008" xmlns:mc="http://schemas.openxmlformats.org/markup-compatibility/2006" mc:Ignorable="d"> <Grid Padding="10"> <Grid.RowDefinitions> <RowDefinition Height="Auto" /> <RowDefinition Height="*" /> <RowDefinition Height="*" /> </Grid.RowDefinitions> <TextBox x:Name="lang" Text="csharp" Grid.Row="0" /> <TextBox x:Name="code" Text="var x = 3;
var y = 4;" AcceptsReturn="True" VerticalAlignment="Stretch" Grid.Row="1" /> <Border BorderBrush="Blue" BorderThickness="2" Background="LightBlue" Padding="10" Grid.Row="2"> <local:PrismJsView Code="{Binding Text, ElementName=code}" Lang="{Binding Text, ElementName=lang}"/> </Border> </Grid> </Page>Press CTRL-F5. You should see this:
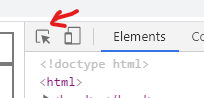
Press F12 (on Chrome, may vary on other browsers).
Click on the first button and select the light-blue part in the app.
It will bring the DOM explorer to a
codenode. ThePrismJsViewshould be right below after opening it.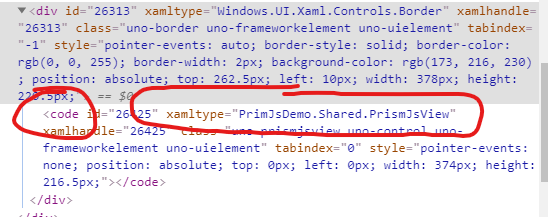
The
codecontrol is there!
👌 The project is now ready to integrate PrismJS.
3. Add JavaScript & CSS files
🎯 In this section, PrismJS files are downloaded from their website and placed as assets in the app.
Go to Prism download page.
Choose desired Themes & Languages (
Defaulttheme + all languages is used for the demo).Press the
DOWNLOAD JSbutton and put theprism.jsfile in theWasmScriptsfolder of the.Wasmproject.Putting the
.jsfile in this folder will instruct the Uno Wasm Bootstrapper to automatically load the JavaScript file during startup.Press the
DOWNLOAD CSSbutton and put theprism.cssfile in theWasmCSSfolder of the.Wasmproject.Putting the
.cssfile in this folder will instruct the Uno Wasm Bootstrapper to automatically inject a<link>HTML instruction in the resultingindex.htmlfile to load it with the browser.Right-click on the
.Wasmproject node in the Solution Explorer, and pickEdit Project File(it can also work by just selecting the project, if thePreview Selected Itemoption is activated).Insert this in the appropriate
<ItemGroup>:<ItemGroup> <EmbeddedResource Include="WasmCSS\Fonts.css" /> <EmbeddedResource Include="WasmCSS\prism.css" /> <!-- This is new --> <EmbeddedResource Include="WasmScripts\AppManifest.js" /> <EmbeddedResource Include="WasmScripts\prism.js" /> <!-- This one too --> </ItemGroup>For the Uno Wasm Bootstrapper to take those files automatically and load them with the application, they have to be put as embedded resources. A future version of Uno may remove this requirement.
Compile & run
Once loaded, press F12 and go into the
Sourcestab. Bothprism.js&prism.cssfiles should be loaded this time.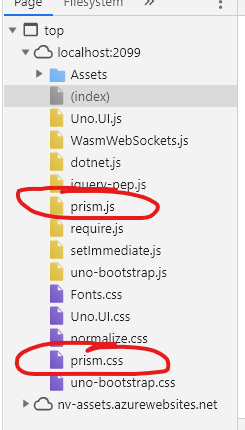
4. Invoke JavaScript from Managed Code
🎯 In this section, PrismJS is used from the app.
First, there is a requirement for PrismJS to set the
white-spacestyle at a specific value, as documented here. An easy way to do this is to set in directly in the constructor like this:public PrismJsView() { _element = BrowserHtmlElement.CreateHtmlElement("code"); Content = _element; // This is required to set to <code> style for PrismJS to works well // https://github.com/PrismJS/prism/issues/1237#issuecomment-369846817 _element.SetCssStyle("white-space", "pre-wrap"); }Now, we need to create an
UpdateDisplay()method, used to generate HTML each time there's a new version to update. Here's the code for the method to add in thePrismJsViewclass:private void UpdateDisplay(string oldLanguage = null, string newLanguage = null) { string javascript = $$""" (function(){ // Prepare Prism parameters const code = "{{BrowserHtmlElement.EscapeJs(Code)}}"; const oldLanguageCss = "language-{{BrowserHtmlElement.EscapeJs(oldLanguage)}}"; const newLanguageCss = "language-{{BrowserHtmlElement.EscapeJs(newLanguage)}}"; const language = "{{BrowserHtmlElement.EscapeJs(newLanguage ?? Lang)}}"; // Process code to get highlighted HTML const prism = window.Prism; let html = code; if(prism.languages[language]) { // When the specified language is supported by PrismJS... html = prism.highlight(code, prism.languages[language], language); } // Display result element.innerHTML = html; // Set CSS classes, when required if(oldLanguageCss) { element.classList.remove(oldLanguageCss); } if(newLanguageCss) { element.classList.add(newLanguageCss); } })(); """; _element.ExecuteJavascript(javascript); }Change
CodeChanged()andLangChanged()to call the newUpdateDisplay()method:private static void CodeChanged(DependencyObject dependencyobject, DependencyPropertyChangedEventArgs args) { (dependencyobject as PrismJsView)?.UpdateDisplay(); } private static void LangChanged(DependencyObject dependencyobject, DependencyPropertyChangedEventArgs args) { (dependencyobject as PrismJsView)?.UpdateDisplay(args.OldValue as string, args.NewValue as string); }We also need to update the result when the control is loaded in the DOM. So we need to change the constructor again like this:
public PrismJsView()
{
    // This is required to set to <code> style for PrismJS to works well
    // https://github.com/PrismJS/prism/issues/1237#issuecomment-369846817
    _element.SetCssStyle("white-space", "pre-wrap");
    // Update the display when the element is loaded in the DOM
    Loaded += (snd, evt) => UpdateDisplay(newLanguage: Lang);
}
Compile & run. It should work like this:
🔬 Going further
This sample is a very simple integration as there is no callback from HTML to managed code and PrismJS is a self-contained framework (it does not download any other JavaScript dependencies). Some additional improvements can be done to make the code more production ready:
- Make the control multi-platform. Another would be to use a WebView on other platforms, giving the exact same text-rendering framework everywhere. The code of this sample won't run on non-WebAssembly targets.
- Use script files instead of using
ExecuteJavascript. That would have the advantage of improving performance and making it easier to debug the code. - Support more PrismJS features. There are many plugins for PrismJS that can be used. Most of them are very easy to implement.
- Continue with Part 3 - an integration of a more complex library with callbacks to application.