Get Started on Visual Studio 2022 For Mac
While it is easier to create apps using Uno Platform on Windows, you can also create all but UWP/WinUI apps on your Mac.
Prerequisites
- Visual Studio 2022 for Mac Preview
- Xcode 14.1 or higher
- An Apple ID
- GTK+3 for running the Skia/GTK projects
Finalize your environment
Open a Terminal.
a. Install the tool by running the following command from the command prompt:
dotnet tool install -g uno.checkb. To update the tool, if you already have an existing one:
dotnet tool update -g uno.checkRun the tool from the command prompt with the following command:
uno-checkIf the above command fails, use the following:
~/.dotnet/tools/uno-checkFollow the instructions indicated by the tool
You can find additional information about uno-check here.
Installing the dotnet new templates
In order to create a new Uno Project, you'll need to install the dotnet new Uno Platform templates.
Create a new project using the IDE
To create a new project, from the command line, where
srcis your own development folder.cd src dotnet new unoapp -o MyApp01Once created, open the
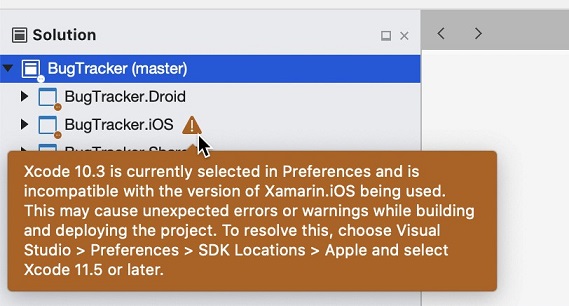
MyApp-vsmac.slnffile- This
slnfis called a solution filter, which automatically excludes projects which are not compatible with Visual Studio 2022 for Mac. - If you have a warning symbol on your iOS project, make sure you have the minimum version of Xcode installed.
 \
\
- This
To update, go to Visual Studio > Preferences > Projects > SDK Locations > Apple and select Xcode 13.3 or higher.
Restart Visual Studio.
- You can now run on iOS, Android, macOS, and Skia.GTK projects by changing your startup project and starting the debugger.
Note
You will not be able to build the UWP and WPF projects on a Mac. All changes to this project must be made on Windows.
Important
As of .NET 6 Mobile RC3, the macOS head can fail to build with issues related to the AOT compiler. You can run the Catalyst app on a mac.
Create other projects types using the command line
You can create a new Uno Platform solution with the following terminal command:
bash dotnet new unoapp -o MyProject --wasm=false
Once created, you can open it using Visual Studio 2022 for Mac.
Build and Run for WebAssembly
Building for WebAssembly takes a few more steps:
- Set
MyProject.Wasmto startup project - Build the project
- In the terminal, navigate to your build output path. This will typically be:
MyProject.Wasm > bin > Debug > net7.0 > dist - Install
dotnet serve:dotnet tool install -g dotnet-serve - Once installed type
dotnet serve(or~/.dotnet/tools/dotnet-serve). - Navigate to the URL presented by the tool to run your application
Using Visual Studio Code snippets to add new XAML files
There is no similar extension at the moment available for Visual Studio for Mac, so we invite you to use the Uno Platform Visual Studio Code Extension.
This extension comes with snippets to easily add new files like Page, UserControl, and ResourceDictionary in addition to other additional useful snippets to enhance your coding experience on Mac for the XAML files.
Visit our getting started section with Visual Studio Code for more details.
You're all set! You can now head to our tutorials on how to work on your Uno Platform app.
Troubleshooting
SDK iOS version incompatible with Xcode version
Sometimes the SDK iOS version is incompatible with the Xcode version. To workaround this issue you can open a terminal, and type the following command:
sudo dotnet workload update
iOS Simulators do not appear
The issue is related to Visual Studio for Mac that changes a general TFM, like net7.0-ios, to a version-specific TFM, like net7.0-ios16.1, which causes Visual Studio to not be able to load the list of simulators.
A workaround for this will be to roll back to net7.0-ios for the TargetFrameworks and you will be able to see the simulators again. To do that, you will need to edit the NameOfMyProject.iOS.csproj or NameOfMyProject.Mobile.csproj file by right-clicking the associated project head, and selecting Edit Project File.
Getting Help
If you continue experiencing issues with Uno Platform, please visit our GitHub Discussions or Discord - #uno-platform channel where our engineering team and community will be able to help you.