Create a Single Page App with Uno Platform
Note
Estimated time to complete: 10 minutes
In this tutorial you will learn how to:
- Add the Uno Platform Project Templates to Visual Studio
- Create a new Project with Uno Platform
- Use the
ElementNameproperty for element-to-element binding
The tutorial walks you through creating a small multi-platform application with Uno Platform – a small app containing only a simple horizontal slider control. Also, you will learn how to run your applications on all platforms supported by Uno Platform.
Before you start the tutorial
If you haven't prepared your dev environment for Uno Platform app development yet, the Setting up the Environment page will guide you through installing all the prerequisites.Getting Started
Open Visual Studio and click on
Create new project.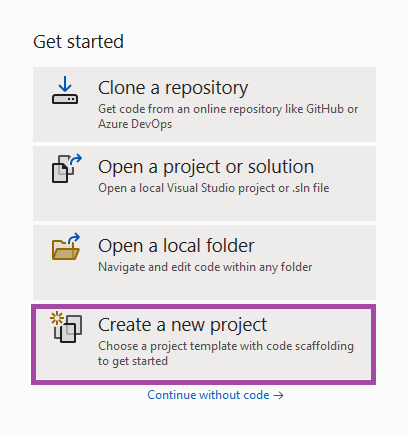
Search for the
Unotemplates, select theUno Platform Appthen clickNext.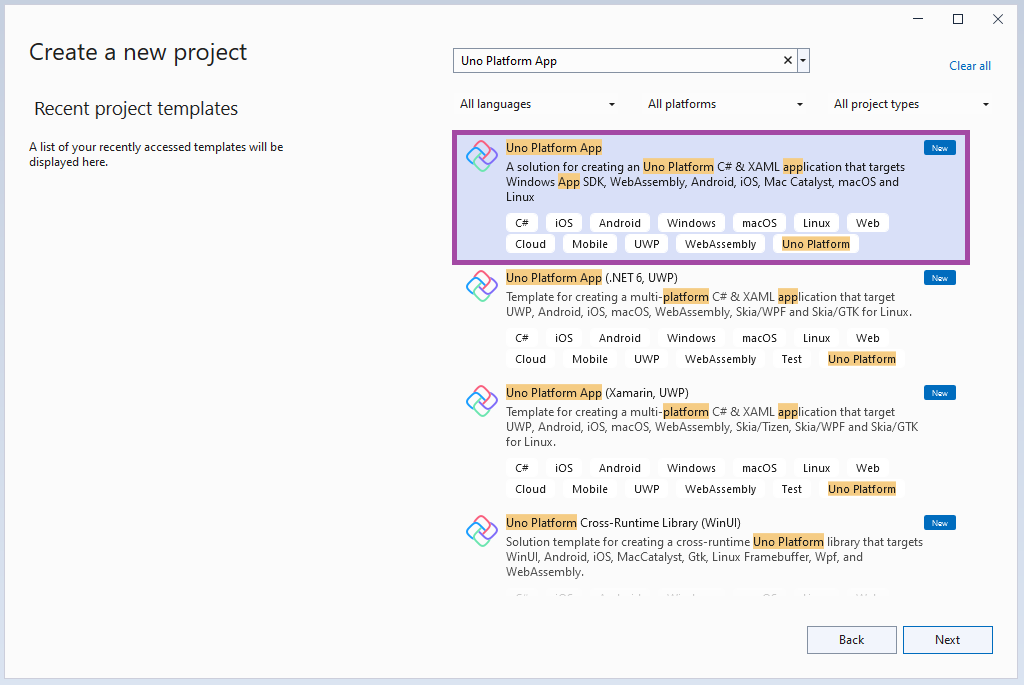
Name your app then click
Next.In the project Wizard:
- Choose the Blank template, then Customize
- In Framework, choose .NET 8.0
- In Platforms, choose your own list including WebAssembly and Windows
- In Presentation, choose the MVVM Presentation
- In Extensions, choose the Frame navigation and Console logging
After a few seconds, a banner may appear at the top of the editor asking to reload projects. Click Reload projects.

In your
MyAppClass Library project, open upMainPage.xamlOn the top left corner of the XAML editor, make sure to select
MyApp (net7.0-windows.10.0.XXX)in the dropdownReplace the inner content of the
Pagewith the following<Grid> <StackPanel> <TextBlock Text="Hello Uno Platform" Margin="20" FontSize="30" /> </StackPanel> </Grid>Add a
Slider<Grid> <StackPanel> <TextBlock Text="Hello World" Margin="20" FontSize="30" /> <Slider x:Name="slider"/> </StackPanel> </Grid>Bind the
Textvalue of yourTextBlockto the value of theSlider<Grid> <StackPanel> <TextBlock Text="{Binding Value, ElementName=slider}" Margin="20" FontSize="30" /> <Slider x:Name="slider"/> </StackPanel> </Grid>Select
MyApp.Windowsas the Startup Project, select thex86platform, thenRunNote
To change the startup project from the Solution Explorer, right-click the desired project and choose Set as StartUp Project from the context-sensitive menu that is displayed. You can also choose this menu item from the Project menu.

Result!

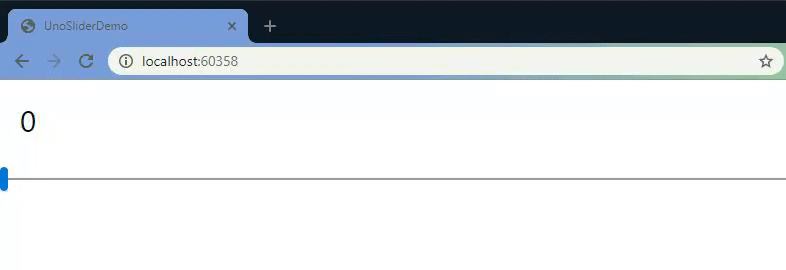
Select
MyApp.Wasmas the Startup Project andRun
Result!
Congratulations, you’ve just built your first multi-platform application with Uno Platform! Feel free to select some other platform heads as your Startup Project and run them – just make sure you have all prerequisites installed to run on all other platforms.
Next:
Got questions? Want to learn more? Looking for production-ready examples? Check out the next tutorial page. We will walk you through a BugTracker sample and build out a full Uno Platform app.