Create a Single Page App with Uno Platform
Note
Estimated time to complete: 30 minutes
In this tutorial you will learn how to:
- Add the Uno Platform Project Templates to Visual Studio
- Create a new Project with Uno Platform
- Learn basics on Model Binding
The tutorial walks you through creating a cross platform application with Uno Platform - a simple Bug Tracking app - which enables you to see a single Issue entry.
Before you start the tutorial
Getting Started
Open Visual Studio and click on
Create new project.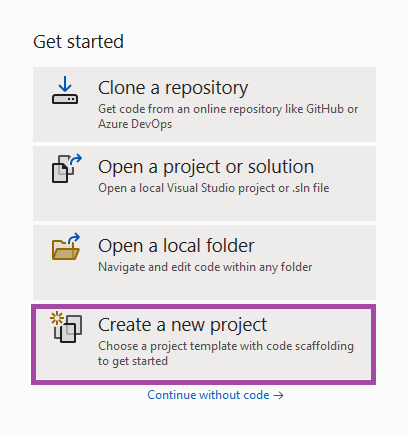
Search for the
Unotemplates, select theUno Platform Appthen clickNext.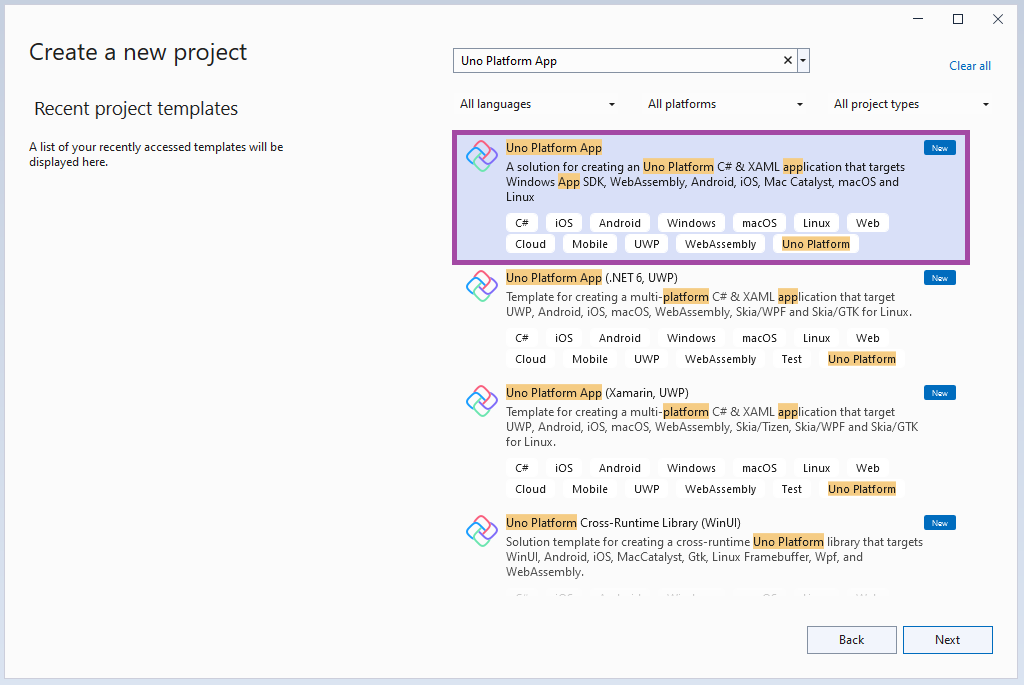
In the
Configure your new projectwindow, set theProject nametoBugTracker, choose where you would like to save your project and click theCreatebutton.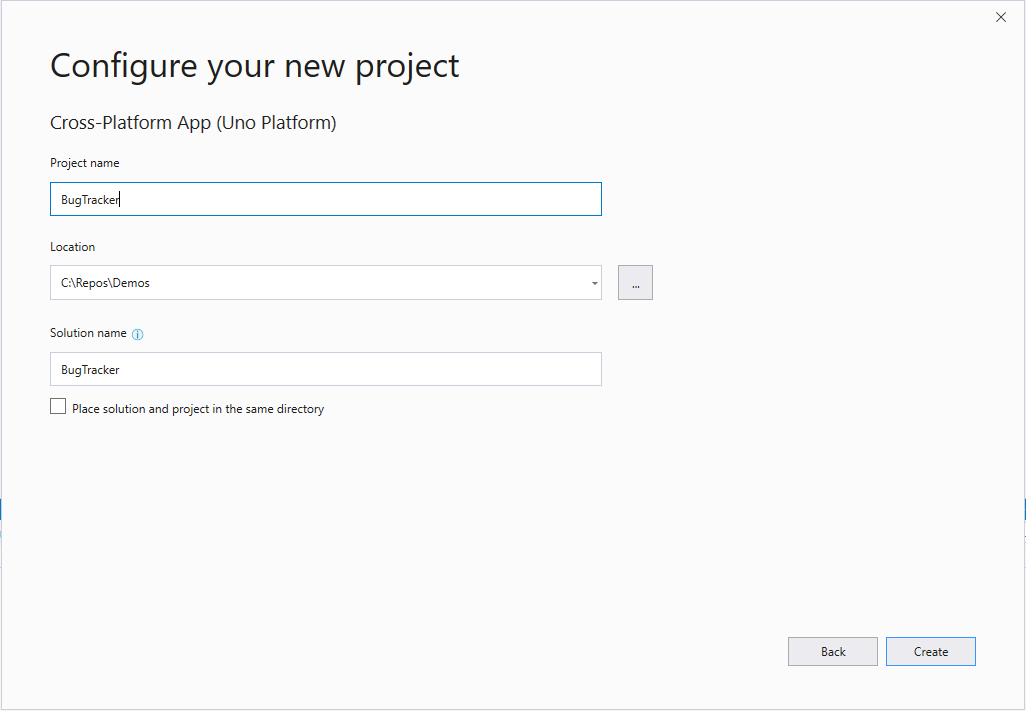
Important
The C# and XAML snippets in this tutorial requires that the solution is named BugTracker. Using a different name will result in build errors when you copy code from this tutorial into the solution.
In the project Wizard:
- Choose the Blank template, then Customize
- In Framework, choose .NET 7.0
- In Platforms, choose your own list including WebAssembly and Windows
- In Presentation, choose the MVVM Presentation
- In Extensions, choose the Frame navigation and Console logging
After a few seconds, a banner may appear at the top of the editor asking to reload projects. Click Reload projects.

Right-click on
BugTrackerproject and selectManage NuGet Packages for Solutionfrom the context menu.- Make sure to select nuget.org or NuGet official package source as the package source
- Click back on the Browse tab and install the following NuGet Packages in the
BugTrackerproject:Refractored.MvvmHelpers
Finally, you'll need to close any opened file in the editor, then close the solution or Visual Studio, then re-open it. This is a workaround for a Visual studio issue regarding the XAML editor.
Setting up our Model
Add a Models folder in the BugTracker Project.

Add a new
IssueItem.csfile then paste in the following code:using MvvmHelpers; namespace Models; public class IssueItem : ObservableObject { private int id; public int Id { get => id; set => SetProperty(ref id, value); } private IssueType type; public IssueType Type { get => type; set => SetProperty(ref type, value); } private string? title; public string? Title { get => title; set => SetProperty(ref title, value); } private string? description; public string? Description { get => description; set => SetProperty(ref description, value); } private IssueStatus status; public IssueStatus Status { get => status; set => SetProperty(ref status, value); } private int effort; public int Effort { get => effort; set => SetProperty(ref effort, value); } private DateTimeOffset createdAt = DateTimeOffset.Now.ToLocalTime(); public DateTimeOffset CreatedAt { get => createdAt; set => SetProperty(ref createdAt, value); } private DateTimeOffset? startedAt; public DateTimeOffset? StartedAt { get => startedAt; set => SetProperty(ref startedAt, value); } private DateTimeOffset? completedAt; public DateTimeOffset? CompletedAt { get => completedAt; set => SetProperty(ref completedAt, value); } } public enum IssueType { Bug, Issue, Task, Feature } public enum IssueStatus { Icebox, Planned, WIP, Done, Removed }Important
Because we want to be able to respond to changes in our model we'll want to bring in the
ObservableObjectin theMvvmHelpersnamespace, from theRefractored.MvvmHelpersNuGet package we installed earlier.
Setting up our Page
First, we will add some base properties to bind to in our XAML. In the Solution Explorer, double-click MainPage.xaml.cs to open, then add the following code.
using BugTracker.Models;

namespace BugTracker;

public sealed partial class MainPage : Page
{
    private IssueItem? _item;

    public MainPage()
    {
        this.InitializeComponent();
    }

    public IssueItem? Item
    {
        get => _item;
        set
        {
            _item = value;
            Bindings.Update();
        }
    }

    public IssueStatus[] StatusList => new[]
    {
        IssueStatus.Icebox,
        IssueStatus.Planned,
        IssueStatus.WIP,
        IssueStatus.Done,
        IssueStatus.Removed
    };

    public IssueType[] IssueTypeList => new[]
    {
        IssueType.Bug,
        IssueType.Feature,
        IssueType.Issue,
        IssueType.Task
    };

    protected override void OnNavigatedTo(NavigationEventArgs e)
    {
        Item = new IssueItem
        {
            Id = 1232,
            Title = "Getting Started",
            Description =
                """
                Create a page to enter Issues that we need to work on.

                ## Acceptance Criteria

                - Display the issue Id
                - Provide an ability to select the issue Type (i.e. Bug, Feature, etc)
                - Include an Issue Title
                - Include a full issue description with support for Markdown
                - Include an issue effort
                - Include an ability for a developer to update the Status (i.e. Icebox, WIP, etc)

                ## Additional Comments

                We would like to have a visual indicator for the type of issue as well as something to visualize the effort involved
                """,
            Effort = 3,
            Status = IssueStatus.WIP,
            Type = IssueType.Feature,
            CreatedAt = new DateTimeOffset(2019, 04, 03, 08, 0, 0, TimeSpan.FromHours(-8)),
            StartedAt = new DateTimeOffset(2019, 04, 30, 08, 0, 0, TimeSpan.FromHours(-8))
        };
    }
}
Now that we have some basic data to bind to, in the Solution Explorer, double-click MainPage.xaml to open it.
On the top left corner of the XAML editor, make sure to select
BugTracker (net7.0-windows.10.0.XXX)in the dropdownThen we'll add some XAML. We will start with an XML Namespace for the Converters as shown below:
<Page x:Class="BugTracker.MainPage"
      xmlns="http://schemas.microsoft.com/winfx/2006/xaml/presentation"
      xmlns:x="http://schemas.microsoft.com/winfx/2006/xaml"
      xmlns:converters="using:BugTracker.Converters"
      xmlns:d="http://schemas.microsoft.com/expression/blend/2008"
      xmlns:mc="http://schemas.openxmlformats.org/markup-compatibility/2006"
      xmlns:ios="http://nventive.com/ios"
      Background="{ThemeResource ApplicationPageBackgroundThemeBrush}"
      mc:Ignorable="d ios">
Important
We can bring in Platform-Specific namespaces like shown above to specifically set properties for a specific platform.
Now we will update the Grid so that we define 6 rows with a small spacing between the rows to add a little padding between the row elements.
<Grid>
  <Grid.RowDefinitions>
    <RowDefinition Height="Auto" />
    <RowDefinition Height="Auto" />
    <RowDefinition Height="Auto" />
    <RowDefinition Height="Auto" />
    <RowDefinition Height="Auto" />
    <RowDefinition Height="*" />
  </Grid.RowDefinitions>

</Grid>
Inside the Grid, beneath the RowDefinitions, we will now add our first row that will contain a Header with a TextBlock containing the Issue Id, and a ComboBox to select what type of issue we are working on. Because our model is a property of the Page we will use x:Bind to bind to our Item property. You will notice that you can dot into the property to Bind directly to a property of the Item model.
<StackPanel Grid.Row="0" Orientation="Horizontal" Background="LightGray" Padding="5">
  <Canvas Background="Blue" Width="10" x:Name="IssueTypeIndicator" />
  <TextBlock Text="{x:Bind Item.Id}" Margin="6,0" VerticalAlignment="Center" />
  <ComboBox x:Name="IssueTypeBox"
            ItemsSource="{x:Bind IssueTypeList}"
            SelectedItem="{x:Bind Item.Type,Mode=TwoWay}"
            SelectionChanged="IssueType_SelectionChanged"
            PlaceholderText="Enter the Issue Type"
            HorizontalAlignment="Stretch"
            Margin="10,0,0,0"/>
</StackPanel>
Important
Take note that we have added a reference to an event handler on the ComboBox. We will add this later in the code behind.
Now after the StackPanel we added in the last step, we will add an area where we can edit the multi-line description of the Issue.
<TextBox Text="{x:Bind Item.Description,Mode=TwoWay}"
         Grid.Row="2"
         AcceptsReturn="True"
         Header="Description"
         Height="200"
         Margin="10,0"
         PlaceholderText="Enter Text Here" />
Finally, we will add the last section to our layout to handle the planning. Here we will show the estimated Effort it will take to resolve the issue, what the current status is, and when the Issue was Started and Completed.
<TextBlock Text="Planning" FontWeight="Bold" FontSize="16" Grid.Row="3" Margin="10,0" />

<StackPanel Orientation="Horizontal" Grid.Row="4" Margin="10,0" Spacing="20">
  <StackPanel Background="LightGray" Padding="20">
    <TextBlock Text="Effort" FontWeight="Bold" FontSize="16" Margin="10,0" />
    <TextBox Text="{x:Bind Item.Effort,Mode=TwoWay}"
               HorizontalTextAlignment="Center"
               HorizontalAlignment="Center"
               HorizontalContentAlignment="Center"
               BorderBrush="Transparent"
               Background="Transparent"/>
    <Slider Value="{x:Bind Item.Effort,Mode=TwoWay}" Width="100" Minimum="0" Maximum="15" />
  </StackPanel>
  <StackPanel Background="LightGray"
              Padding="20">
    <TextBlock Text="Status" FontWeight="Bold" FontSize="16" Margin="10,0" />
    <ComboBox ItemsSource="{x:Bind StatusList}"
              SelectedItem="{x:Bind Item.Status, Mode=TwoWay}"
              HorizontalAlignment="Stretch"
              SelectionChanged="StatusPicker_SelectionChanged" />
    <TextBlock Text="{x:Bind FormatDate('Started:', Item.StartedAt), Mode=OneWay}" />
    <TextBlock Text="{x:Bind FormatDate('Completed:', Item.CompletedAt), Mode=OneWay}" />
  </StackPanel>
</StackPanel>

<TextBlock Text="{x:Bind FormatDate('Created:', Item.CreatedAt)}" Grid.Row="5"
           Margin="10,0"/>
Important
Take note that we have added a reference to an event handler on the ComboBox. We will add this in the next step in the code behind.
Now that our Page is complete we can go back and add the event handlers in our code behind. This will allow us to handle changes and make necessary updates. In the Solution Explorer, double-click MainPage.xaml.cs to open, then add the following code.
// Sets the time when we Complete or Start an issue.
private void StatusPicker_SelectionChanged(object sender, SelectionChangedEventArgs args)
{
 	if (Item is not null)
 	{
 		switch (Item.Status)
 		{
 			case IssueStatus.Removed:
 			case IssueStatus.Done:
 				if (Item.CompletedAt is null)
 					Item.CompletedAt = DateTimeOffset.Now.ToLocalTime();
 				break;
 			case IssueStatus.WIP:
 				if (Item.StartedAt is null)
 					Item.StartedAt = DateTimeOffset.Now.ToLocalTime();
 				break;
 			default:
 				Item.StartedAt = null;
 				Item.CompletedAt = null;
 				break;
 		}
 	}
}

// Provides a unique color based on the type of Issue
private void IssueType_SelectionChanged(object sender, SelectionChangedEventArgs args)
{
    var color = Colors.Red;
    switch (IssueTypeBox.SelectedItem)
    {
        case IssueType.Feature:
            color = Colors.Green;
            break;
        case IssueType.Issue:
            color = Colors.Blue;
            break;
        case IssueType.Task:
            color = Colors.Yellow;
            break;
    }
    IssueTypeIndicator.Background = new SolidColorBrush(color);
}
You may need to add missing namespace
usings, eg theWindows.UInamespace for theColorsclass. Don't worry ifIssueTypeBoxandIssueTypeIndicatorare marked red - these properties will be created from the XAML when the project builds.Finally, let's add a method to do the
DateTimeOffsetconversion usingx:Bindfunctions binding:// Provides the conversion for dates in the XAML through x:Bind public string FormatDate(string header, DateTimeOffset? dateTime) => $"{header} {dateTime:MMM dd, yyyy hh:mm tt}";Build and run the project on each platform. When launching the WASM head, use 'Start without debugging' (
Ctrl+F5).You will notice as you make changes to the Issue type, you will see the indicator in the upper left hand corner changing colors as well.
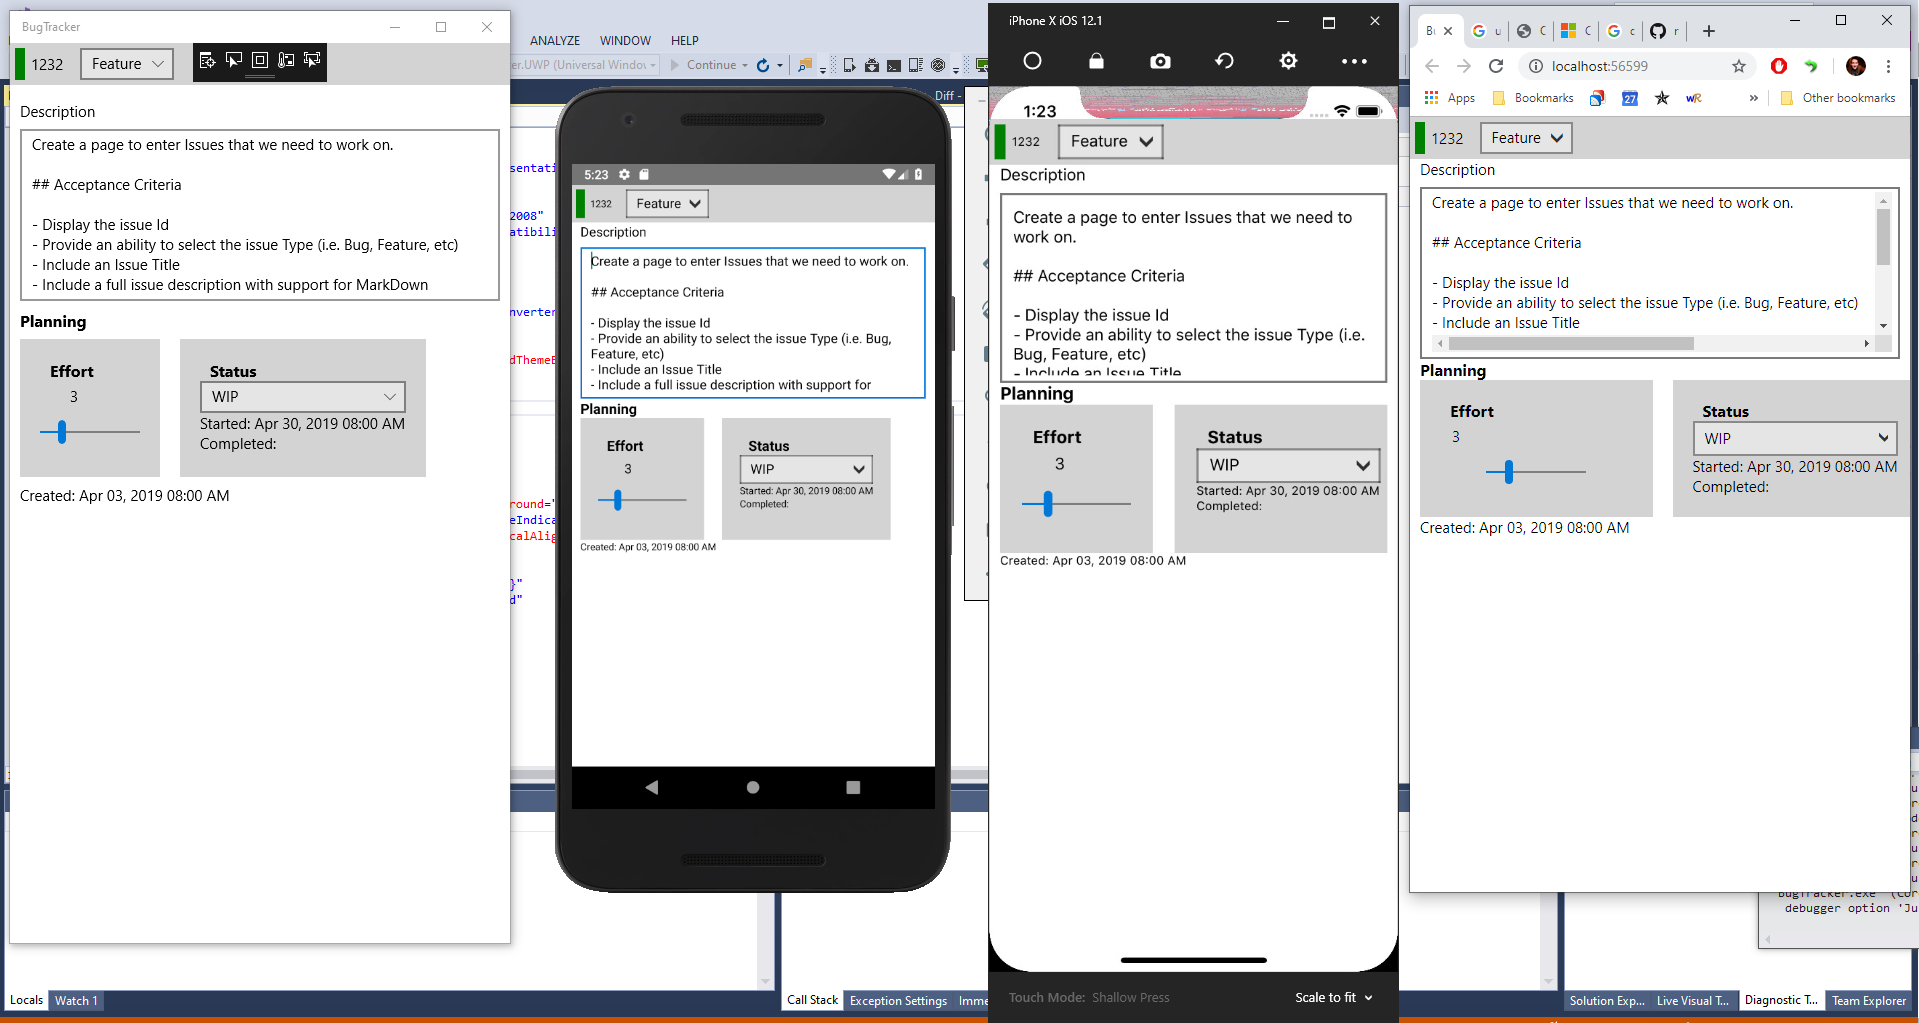
The final result
You should see something similar to the screenshot below. You can download the completed tutorial code here.
In this tutorial, through creating a simple Bug Tracking app you have learned how to:
- Add the Uno Project Templates to Visual Studio
- Create a new Project with Uno Platform
- Use the basics of Model Binding